
Cupcake Graduation Caps 2
This post contains affiliate links. As an Amazon Associate, I earn from qualifying purchases. This comes at no extra cost to you.
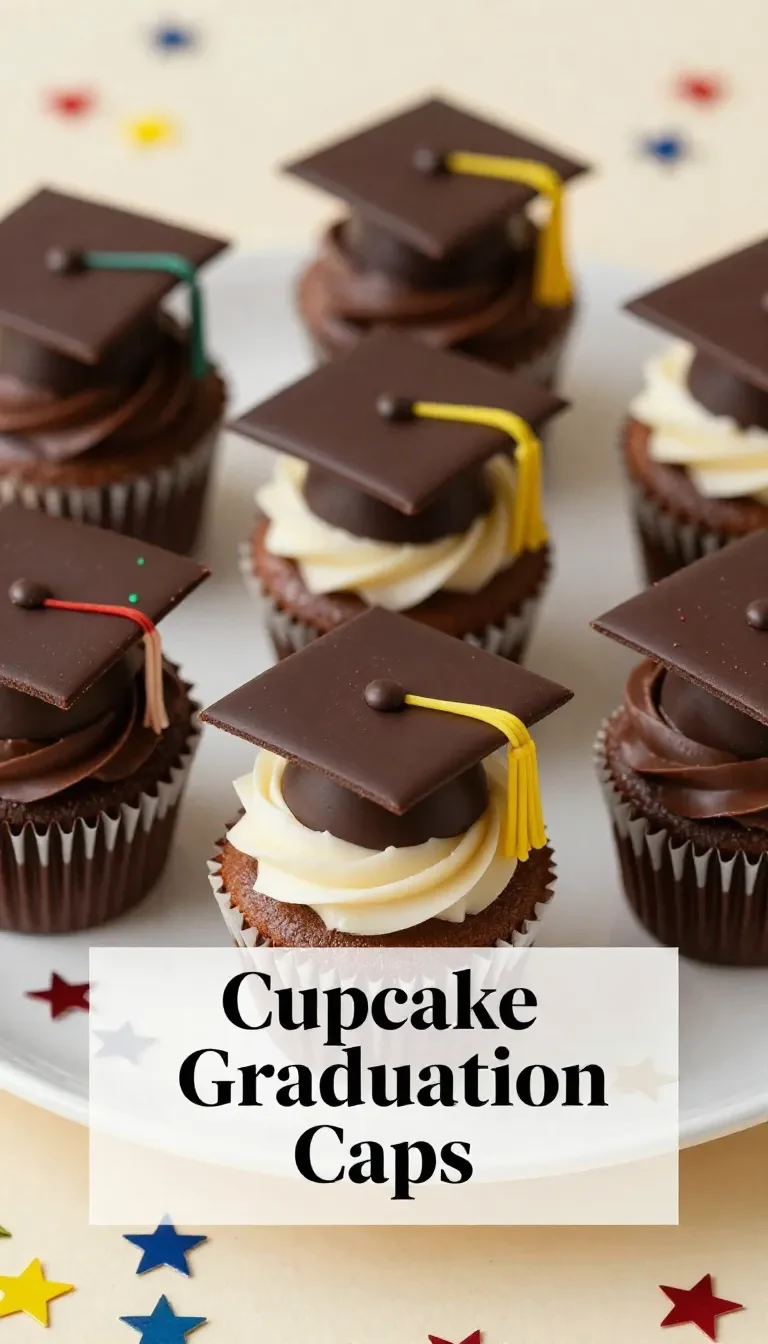
This Cupcake Graduation Caps 2 recipe is a charming and creative way to celebrate graduations. Featuring rich chocolate cupcakes adorned with edible caps made of peanut butter cups, graham crackers, and candy, these treats are both festive and simple to assemble. Perfect for parties or gifts, they’re sure to impress graduates and guests alike.
Table of Contents
- Why Make Cupcake Graduation Caps
- Everything You Need for Cupcake Graduation Caps
- How To Make Cupcake Graduation Caps Step by Step
- Serving and Pairing Ideas
- Ingredient Swaps and Substitutions
- Expert Tips and Pro Shortcuts
- Common Mistakes to Avoid
Why Make Cupcake Graduation Caps
- They’re visually striking and perfect for graduation celebrations. The edible cap design adds a fun and memorable touch to your dessert table.
- Easy to assemble with minimal prep time. This recipe is a great choice for busy hosts who want something unique without a lengthy baking process.
- Customizable to match school colors or themes. Swap candy colors for a personalized dessert that ties into your graduate’s special day.
- Great as party favors or gifts. Package them individually, and they’ll leave a lasting impression on guests and graduates alike.
Everything You Need for Cupcake Graduation Caps
- 12 chocolate cupcakes, baked and cooled
- 12 chocolate-covered graham crackers (square-shaped)
- 12 mini peanut butter cups
- 12 small candy-coated chocolates (e.g., M&M’s)
- 12 strips of chewy candy or licorice (cut into tassels)
- 1/2 cup chocolate frosting
- 1/4 cup melted chocolate (for assembly)
Mini peanut butter cups play a key role in creating the “cap base,” while melted chocolate ensures all components adhere securely. Graham crackers add crispness and balance the rich chocolate flavors.
How To Make Cupcake Graduation Caps Step by Step
- Ensure your chocolate cupcakes are completely cooled before starting. This prevents the frosting and decorations from sliding off during assembly.
- Place a small dollop of chocolate frosting on the center of each cupcake to act as adhesive. Make sure the frosting is thick enough to hold the decorations securely.
- Attach a mini peanut butter cup upside-down on top of the frosting on each cupcake. Position it carefully so the flat bottom faces upward.
- Spread a thin layer of melted chocolate on the bottom of a chocolate-covered graham cracker. Carefully press it onto the flat surface of the peanut butter cup to create the “graduation cap.”
- Cut chewy candy or licorice into thin strips to form tassels. Use a small drop of melted chocolate to attach the tassel to the center of each graham cracker.
- Place a candy-coated chocolate on top of the tassel attachment point to mimic the button on the graduation cap. Use melted chocolate to secure it in place.
- Allow the melted chocolate to set completely before serving. Refrigerate briefly if needed to speed up the process.
- Arrange the Cupcake Graduation Caps on a plate or tray for a festive presentation and serve!
Makes mixing batters and frosting effortless — a must-have for frequent bakers.
Essential for baking perfectly shaped cupcakes — durable and easy to clean.
Serving and Pairing Ideas
- Serve alongside fruit platters for a refreshing balance to the rich chocolate flavors. The bright, natural sweetness of the fruit pairs beautifully with the dessert.
- Pair with frothy milkshakes for a nostalgic, celebratory treat. Chocolate or vanilla flavors enhance the dessert’s theme.
- Offer coffee or tea as a beverage option for adult attendees. The warm, bitter notes complement the sweetness of the cupcakes.
- Use decorative trays with school colors for presentation. This adds an extra layer of personalization to the graduation festivities.
Ingredient Swaps and Substitutions
- Swap mini peanut butter cups with chocolate truffles for a slightly different texture. Truffles provide a creamier base while retaining the chocolate flavor.
- Use marshmallow squares in place of graham crackers for extra chewiness. This adds a fun twist but may require more melted chocolate for securing.
- Replace M&M’s with colored candy pearls for a more sophisticated appearance. Candy pearls come in various hues to match any theme.
Expert Tips and Pro Shortcuts
- Work in small batches to prevent melted chocolate from hardening prematurely. Keep unused melted chocolate warm using a double boiler or microwave.
- Chill the cupcakes briefly before assembly to simplify the process. Firm cupcakes hold decorations better without smearing frosting.
- Use a piping bag for precise application of frosting and melted chocolate. This speeds up the decoration process and ensures cleaner results.
- Prepare tassels ahead of time to save time on assembly day. Store them in an airtight container until ready to use.
Common Mistakes to Avoid
- Skipping the cooling step for cupcakes. Warm cupcakes can cause decorations to shift or melt.
- Using too much melted chocolate, which can make the components slip or look messy. Apply just enough to secure each piece without overflow.
- Attaching decorations without proper alignment. Ensure all pieces are centered to maintain the cap’s visual appeal.
Cupcake Graduation Caps 2
Ingredients
Method
- Ensure your chocolate cupcakes are completely cooled before starting.
- Place a small dollop of chocolate frosting on the center of each cupcake to act as adhesive.
- Attach a mini peanut butter cup upside-down on top of the frosting on each cupcake.
- Spread a thin layer of melted chocolate on the bottom of a chocolate-covered graham cracker. Carefully press it onto the flat surface of the peanut butter cup to create the 'graduation cap.'
- Cut chewy candy or licorice into thin strips to form tassels. Use a small drop of melted chocolate to attach the tassel to the center of each graham cracker.
- Place a candy-coated chocolate on top of the tassel attachment point to mimic the button on the graduation cap. Use melted chocolate to secure it.
- Allow the melted chocolate to set completely before serving. Refrigerate briefly if needed to speed up the process.
- Arrange the Cupcake Graduation Caps on a plate or tray for a festive presentation and serve!
Notes
Loved this recipe? Save it to your favorite Pinterest board so you can easily find it later! ✨

Nutrition Expert - Specialty: Dietary Science & Chronic Disease Prevention I believe food is the most powerful medicine we have.
- Adam John

- Adam John
- Adam John
- Adam John